Using Asp.Net Zero with Telerik UI
Hi, in this article we will see how we can integrate the Telerik UI for ASP.NET Core (Kendo) components with our Asp.Net Zero MVC app. We will create a product crud app with the Telerik UI grid component.
Let's create a solution named TelerikUIDemo as described in Getting Started document. Using this project name guarantees that the namespace from the code snippets in this tutorial will match your project.
Follow the steps in the Getting Started document and run your application. If you have successfully completed all the steps, you will get a view as below:
Telerik UI Integration with Asp.Net Zero
Adding the Telerik NuGet Feed
The easiest way to add the Telerik NuGet feed to Visual Studio if you have purchased a commercial license is to use the Progress Control Panel:
Download the Progress Control Panel from the Overview page of your Telerik account.
Run the Progress Control Panel.
On the Login screen, check the set up Telerik NuGet package source option.
If you miss to set up the NuGet feed on login, go to the Progress Control Panel options and scroll to NUGET SETTINGS. Enter your Telerik credentials and click the Save and Close button.
You can find the more installation details from here.
Adding Telerik UI to your Asp.Net Zero Project
Open the NuGet Package Manager.
Select the Browse tab and search for Telerik.UI.for.AspNet.Core.
Select the project and install. As a result, a line similar to
<PackageReference Include="Telerik.UI.for.AspNet.Core" Version="2022.2.621" />is added to your .csproj file.
Adding a Reference to Kendo.Mvc.UI on your Asp.Net Zero Project
- Add the following line to your Startup.cs file in Startup folder:
public void ConfigureServices(IServiceCollection services)
{
    // ...other services

    // Add the Kendo UI services to the services container.
    services.AddKendo();
}
- Import the
Kendo.Mvc.UInamespace in~/Areas/App/Views/_ViewImports.cshtmlthrough@using Kendo.Mvc.UI. If you intend to use the Telerik UI ASP.NET Core Tag Helpers, add them with@addTagHelper *, Kendo.Mvc.
@using Abp.Localization
@inherits TelerikUIDemo.Web.Views.TelerikUIDemoRazorPage<TModel>
@addTagHelper *, Microsoft.AspNetCore.Mvc.TagHelpers
@addTagHelper *, TelerikUIDemo.Web.Mvc
@addTagHelper *, Kendo.Mvc
@using Kendo.Mvc.UI
Including the Telerik UI for ASP.NET Zero Client-Side Resources
Add the following code at the end of head tag in ~/Areas/App/Views/Layout/_Layout.cshtml file:
<link href="https://kendo.cdn.telerik.com/2022.2.621/styles/kendo.bootstrap-main.min.css" rel="stylesheet" type="text/css" />

<!-- Add the the jQuery script from the Telerik CDN: -->
<script src="https://kendo.cdn.telerik.com/2022.2.621/js/jquery.min.js"></script>

<!-- Add the Kendo UI scripts: -->
<script src="https://kendo.cdn.telerik.com/2022.2.621/js/kendo.all.min.js"></script>
<script src="https://kendo.cdn.telerik.com/2022.2.621/js/kendo.aspnetmvc.min.js"></script>

</head>
To avoid conflicting jQuery files, remove jQuery from app-layout-libs.min.js at bundles.json as below:
{
      "output": "view-resources/Areas/App/Views/_Bundles/app-layout-libs.min.js",
      "input": [
        "node_modules/json2/lib/JSON2/static/json2.js",
        "node_modules/jquery-validation/dist/jquery.validate.js",
        .
        .
        .
      ]
}
If your widgets are unavailable or undefined, make sure jQuery is not defined more than once. You can find the more details from here.
Running Asp.Net Zero with Telerik UI
Add a simple controller.
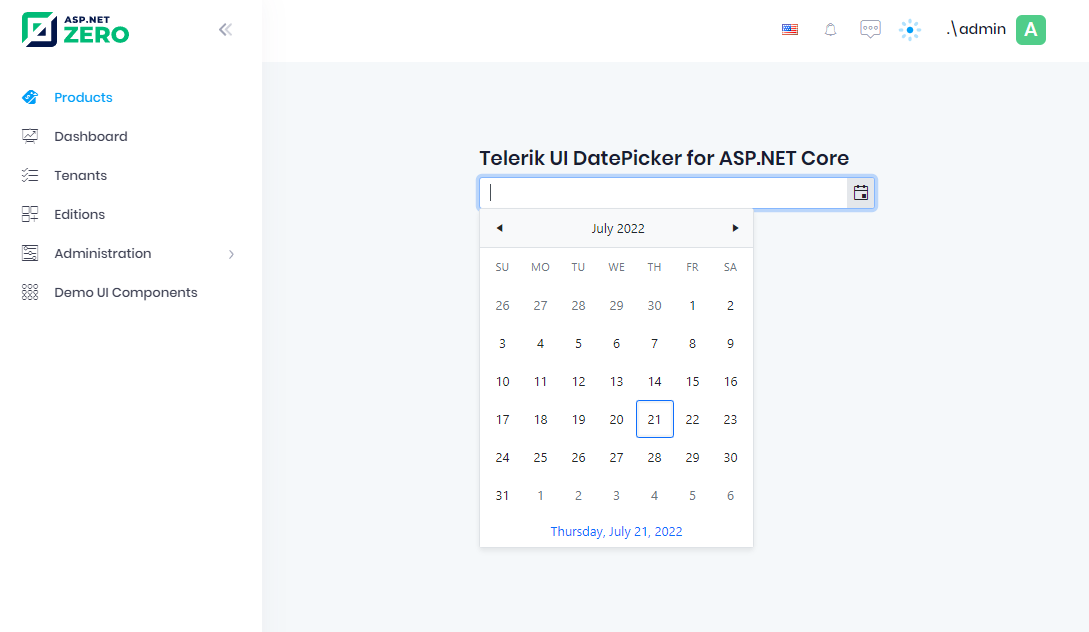
Create a view with Telerik UI Date Picker Component as below:
<div class="row m-0 justify-content-center">
    <div class="col-md-6">
        <h2>Telerik UI DatePicker for ASP.NET Core</h2>
        @(Html.Kendo().DatePicker()
            .Name("my-picker")
            )
    </div>
</div>
- If you have successfully completed all the steps, you will get a view as below:
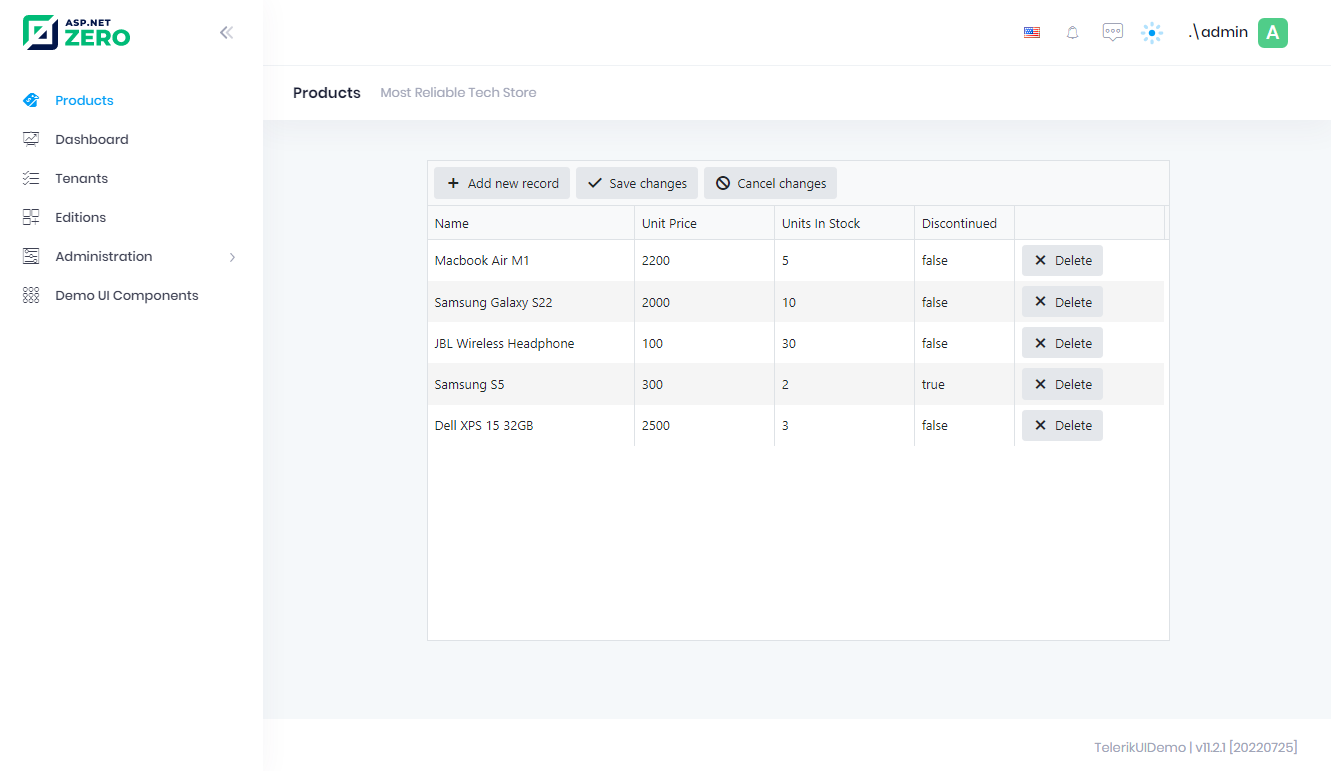
Simple CRUD with Asp.Net Zero using Telerik UI
In this part we will create a simple CRUD application with Asp.Net Zero using Telerik UI. We will use the grid component provided by TelerikUI. You can visit the website for more TelerikUI Asp.Net Core components.
Before starting the Asp.Net Zero and Telerik UI Crud part, if you do not have experience with Asp.Net Zero, I recommend starting with a more detailed tutorial.
Creating Product Entity
We define entities at domain specific folders in .Core (domain) project. We can create a folder named TelerikUI and define a Product entity as shown below:
public class Product : FullAuditedEntity
{
    [Required]
    [MaxLength(ProductConsts.MaxNameLength)]
    public string Name { get; set; }

    public int UnitsInStock  { get; set; }
    public bool Discontinued { get; set; }

    [Required]
    [Range(ProductConsts.MinUnitPrice, MaxValue)]
    public decimal UnitPrice { get; set; }
}
We created PersonConsts in .Core.Shared project for MaxLength properties. This is a good practice since we will use same values later.
public class ProductConsts
{
    public const int MaxNameLength = 64;
    public const int MinUnitPrice = 10;
}
We add a DbSet property for Product entity to TelerikUIDemoDbContext class defined in .EntityFrameworkCore project. Then add migration and update the database. If you're having trouble doing this, you can have a look here.
public class TelerikUIDemoDbContext : AbpZeroDbContext<Tenant, Role, User, TelerikUIDemoDbContext>
{
    public DbSet<Product> Products { get; set; }

    //...other entities

    public TelerikUIDemoDbContext()
        : base("Default")
    {

    }

    //...other codes
}
Creating ProductAppService
public interface IProductAppService : IApplicationService
{
    Task<ListResultDto<ProductListDto>> GetAll();
    Task InsertProduct(InsertProductInput input);
    Task EditProduct(EditProductInput input);
    Task DeleteProduct(EntityDto input);
}
DTO's are used to transfer data between Application Layer and Presentation Layer. We suggest using DTO's to transfer data between layers.
public class ProductListDto : FullAuditedEntityDto
{
    public string Name { get; set; }
    public int UnitsInStock { get; set; }
    public bool Discontinued { get; set; }
    public decimal UnitPrice { get; set; }
}
public class InsertProductInput
{
    public string Name { get; set; }
    public int UnitsInStock { get; set; }
    public decimal UnitPrice { get; set; }
}
public class EditProductInput
{
    public int Id { get; set; }
    public string Name { get; set; }
    public int UnitsInStock { get; set; }
    public bool Discontinued { get; set; }
    public decimal UnitPrice { get; set; }
}
public class ProductAppService : TelerikUIDemoAppServiceBase, IProductAppService
{
    private readonly IRepository<Product> _productRepository;

    public ProductAppService(IRepository<Product> productRepository)
    {
        _productRepository = productRepository;
    }

    public async Task<ListResultDto<ProductListDto>> GetAll()
    {
        var result = await _productRepository.GetAll().ToListAsync();

        return new ListResultDto<ProductListDto>(ObjectMapper.Map<List<ProductListDto>>(result));
    }

    public async Task InsertProduct(InsertProductInput input)
    {
        var product = ObjectMapper.Map<Product>(input);
        await _productRepository.InsertAsync(product);
    }

    public async Task EditProduct(EditProductInput input)
    {
        var product = await _productRepository.GetAsync(input.Id);

        if (product is null)
        {
            throw new UserFriendlyException("Product not found");
        }

        ObjectMapper.Map(input, product);
    }

    public async Task DeleteProduct(EntityDto input)
    {
        var product = await _productRepository.GetAsync(input.Id);

        if (product is null)
        {
            throw new UserFriendlyException("Product not found");
        }

        await _productRepository.DeleteAsync(input.Id);
    }
}
We are adding the following mappings to CustomDtoMapper.cs in .Application project:
configuration.CreateMap<Product, ProductListDto>();
configuration.CreateMap<InsertProductInput, Product>();
configuration.CreateMap<EditProductInput, Product>();
Creating ProductController
[Area("App")]
public class ProductController : TelerikUIDemoControllerBase
{
    private readonly IProductAppService _productAppService;

    public ProductController(IProductAppService productAppService)
    {
        _productAppService = productAppService;
    }

    public async Task<ActionResult> Index()
    {
        var model = await _productAppService.GetAll();
        return View(model.Items);
    }

    [HttpPost]
    public async Task Insert(InsertProductInput insertProductInput)
    {
        await _productAppService.InsertProduct(insertProductInput);
    }

    [HttpPut("{id}")]
    public async Task Edit(EditProductInput editProductInput)
    {
        await _productAppService.EditProduct(editProductInput);
    }

    [HttpDelete("{id}")]
    public async Task<IActionResult> Delete(int id)
    {
        await _productAppService.DeleteProduct(new EntityDto { Id = id });

        return new StatusCodeResult(200);
    }
}
Creating Index.cshtml
@using TelerikUIDemo.Web.Areas.App.Startup

@model IEnumerable<TelerikUIDemo.TelerikUI.Dto.ProductListDto>

@{
    ViewBag.CurrentPageName = AppPageNames.Common.PhoneBook;
}

<div class="content d-flex flex-column flex-column-fluid" id="kt_content">

    <abp-page-subheader title="@L("Editions")" description="@L("EditionsHeaderInfo")">
        Hello
    </abp-page-subheader>

    <div class="@(await GetContainerClass()) w-75 py-3">
        @(Html.Kendo().Grid(Model)
            .Name("Grid")
            .Columns(columns =>
            {
                columns.Bound(p => p.Name);
                columns.Bound(p => p.UnitPrice).Width(140);
                columns.Bound(p => p.UnitsInStock).Width(140);
                columns.Bound(p => p.Discontinued).Width(100);
                columns.Command(command => command.Destroy()).Width(150);
            })
            .ToolBar(toolbar =>
            {
                toolbar.Create();
                toolbar.Save();
            })
            .Editable(editable => editable.Mode(GridEditMode.InCell))
            .Scrollable()
            .DataSource(dataSource =>
                dataSource
                    .WebApi()
                    .Model(model => { model.Id(p => p.Id); })
                    .Events(events => events.Error("error_handler"))
                    .Read(read => read.Action("Index", "Product"))
                    .Create(create => create.Action("Insert", "Product"))
                    .Update(update => update.Action("Edit", "Product", new { id = "{0}" }))
                    .Destroy(destroy => destroy.Action("DELETE", "Product", new { id = "{0}" }))
            )
            )
</div>

<script>

function error_handler(e) {
    var errors = $.parseJSON(e.xhr.responseText);

    if (errors) {
        alert("Errors:\n" + errors.join("\n"));
    }
}
</script>
</div>
The final result of CRUD with Asp.Net Zero using Telerik UI is the following: