ASP.NET Core & Angular File Upload Tutorial
In modern web applications, file uploads are a common requirement for various purposes such as uploading profile pictures, attaching documents, or uploading media files. In this blog post, we'll explore how to implement file uploads using the powerful combination of ASP.NET Core on the server side and Angular on the client side.
I will use the aspnetzero 😀 product to create the application with additional features, a production-ready appearance, and faster development.
ASP.NET Core Part
Create Model
First, create a class named FileUploadViewModel in *.Web.Host\Models folder. This class will be used to transfer additional parameters during the upload process:
public class FileUploadImageViewModel
{
    public string Description { get; set; }
}
Define the Permission
Go to AppAuthorizationProvider class in the server side and add a new permission as shown below (you can add just below the dashboard permission):
pages.CreateChildPermission(AppPermissions.Pages_FileUpload, L("FileUpload"), multiTenancySides: MultiTenancySides.Tenant);
A permission should have a unique name. We define permission names as constant strings in AppPermissions class. It's a simple constant string:
public const string Pages_FileUpload = "Pages.FileUpload";
Unique name of this permission is Pages.FileUpload. While you can set any string (as long as it's unique), it's suggested to use that convention. A permission can have a localizable display name: FileUpload here.
Create Controller
Then, create a controller named FileUploadController in *.Web.Host\Controllers folder. This controller will handle the upload process:
[AbpMvcAuthorize(AppPermissions.Pages_FileUpload)]
public class FileUploadController : AbpZeroTemplateControllerBase
{
    private readonly IHostEnvironment _env;
    public FileUploadController(IHostEnvironment env)
    {
        _env = env;
    }

    [HttpPost]
    public async Task<string> UploadFile(FileUploadViewModel model)
    {
       	var image = Request.Form.Files.First();
        var uniqueFileName = GetUniqueFileName(image.FileName);
        var dir = Path.Combine(_env.ContentRootPath, "Images");
        if (!Directory.Exists(dir))
        {
            Directory.CreateDirectory(dir);
        }
        var filePath = Path.Combine(dir, uniqueFileName);
        await image.CopyToAsync(new FileStream(filePath, FileMode.Create));
        SaveImagePathToDb(model.Description, filePath);
        return uniqueFileName;
    }

    private string GetUniqueFileName(string fileName)
    {
        fileName = Path.GetFileName(fileName);
        return Path.GetFileNameWithoutExtension(fileName)
               + "_"
               + Guid.NewGuid().ToString().Substring(0, 4)
               + Path.GetExtension(fileName);
    }

    private void SaveImagePathToDb(string description, string filepath)
    {
        //todo: description and file path to db
    }
}
The server side of the implementation is done. Let's move to Angular application.
Angular Part
Go to angular folder in your project.
Open a terminal and run
cd src\app\admin.
Generate Component
- Run
ng g component file-upload. That will create a component in admin folder.
Go to generated file-upload.component.ts file and change the content as seen below:
import { Component, Injector, OnInit } from '@angular/core';
import { FileUploader, FileUploaderOptions, FileItem } from 'ng2-file-upload';
import { AppComponentBase } from '@shared/common/app-component-base';
import { ProfileServiceProxy } from '@shared/service-proxies/service-proxies';
import { IAjaxResponse, TokenService } from '@node_modules/abp-ng2-module';
import { AppConsts } from '@shared/AppConsts';
import { appModuleAnimation } from '@shared/animations/routerTransition';
@Component({
    templateUrl: './file-upload.component.html',
    animations: [appModuleAnimation()],
})
export class FileUploadComponent extends AppComponentBase implements OnInit {
    public uploader: FileUploader;
    private _uploaderOptions: FileUploaderOptions = {};
    description: string;

    constructor(injector: Injector, private _tokenService: TokenService) {
        super(injector);
    }

    ngOnInit() {
        this.initFileUploader();
    }

    initFileUploader(): void {
        this.uploader = new FileUploader({ url: AppConsts.remoteServiceBaseUrl + '/FileUpload/UploadFile' });
        this._uploaderOptions.autoUpload = false;
        this._uploaderOptions.authToken = 'Bearer ' + this._tokenService.getToken();
        this._uploaderOptions.removeAfterUpload = true;
        this.uploader.onAfterAddingFile = (file) => {
            file.withCredentials = false;
        };

        this.uploader.onBuildItemForm = (fileItem: FileItem, form: any) => {
            form.append('Description', this.description);
        };

        this.uploader.onSuccessItem = (item, response, status) => {
            const resp = <IAjaxResponse>JSON.parse(response);
            if (resp.success) {
                this.message.success(this.l('FileSavedSuccessfully', response));
            } else {
                this.message.error(resp.error.message);
            }
        };

        this.uploader.setOptions(this._uploaderOptions);
    }

    save(): void {
        this.uploader.uploadAll();
    }

    fileChangeEvent(event: any): void {
        this.uploader.clearQueue();
        this.uploader.addToQueue([event.target.files[0]]);
    }
}
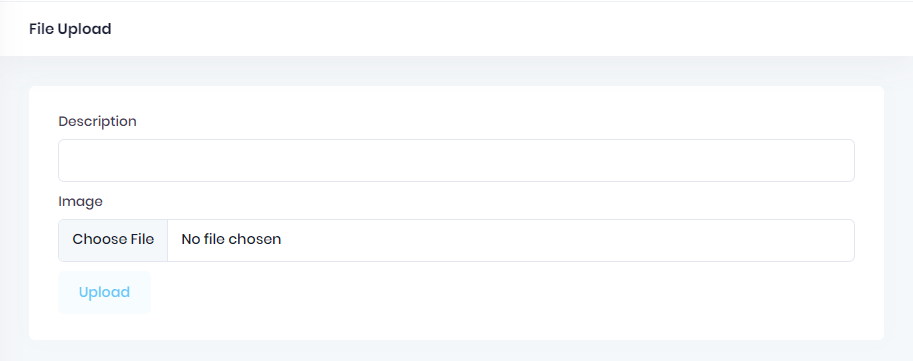
Go to generated file-upload.component.html file and change the content as seen below:
<div [@routerTransition]>
    <div class="content d-flex flex-column flex-column-fluid">
        <sub-header [title]="'FileUpload' | localize">
        </sub-header>
        <div [class]="containerClass">
            <div class="card card-custom">
                <div class="card-body">
                    <form id="fileUploadForm" enctype="multipart/form-data" #fileUploadForm="ngForm"
                        (ngSubmit)="save()">
                        <div class="mb-3">
                            <label for="Description" class="form-label">{{"Description" | localize}}</label>
                            <input class="form-control" type="text" id="Description" name="Description"
                            [(ngModel)]="description" required>
                        </div>

                        <div class="mb-3">
                            <label for="Image" class="form-label">{{"Image" | localize}}</label>
                            <input class="form-control" type="file" id="Image" name="Image" required
                                (change)="fileChangeEvent($event)">
                        </div>
                        <button type="submit"
                                class="btn btn-light-primary font-weight-bold close-button"
                                [disabled]="!fileUploadForm.form.valid">{{"Upload" | localize}}
                        </button>
                    </form>
                </div>
            </div>
        </div>
    </div>
</div>
Create Angular Modules
Now we should create a file-upload.module.ts and file-upload-routing.module.ts view in the same file-upload folder:
file-upload-routing.module.ts
import {NgModule} from '@angular/core';
import {RouterModule, Routes} from '@angular/router';
import {FileUploadComponent} from './file-upload.component';

const routes: Routes = [{
    path: '',
    component: FileUploadComponent,
    pathMatch: 'full'
}];

@NgModule({
    imports: [RouterModule.forChild(routes)],
    exports: [RouterModule],
})
export class FileUploadRoutingModule {}
file-upload.module.ts
import {NgModule} from '@angular/core';
import { AppSharedModule } from '@app/shared/app-shared.module';
import {FileUploadRoutingModule} from './file-upload-routing.module';
import {FileUploadComponent} from './file-upload.component';
import { SubheaderModule } from '@app/shared/common/sub-header/subheader.module';
@NgModule({
    declarations: [FileUploadComponent],
    imports: [AppSharedModule, FileUploadRoutingModule, SubheaderModule],
})
export class FileUploadModule {}
Add Routings
Go to src\app\shared\layout\nav\app-navigation.service.ts and add new menu item:
new AppMenuItem('FileUpload', 'Pages.FileUpload', 'flaticon-file-1', '/app/admin/fileUpload'),
Go to src\app\admin\admin-routing.module.ts and add new route for file upload page:
{
    path: 'fileUpload',
    loadChildren: () => import('./file-upload/file-upload.module').then((m) => m.FileUploadModule),
    data: { permission: 'Pages.FileUpload' }
},
Result